Upgrade Python to latest version (3.14) on Ubuntu Linux or WSL2
On this page
Last Updated: 2026-04-13
Ubuntu both Desktop & WSL2 Linux systems come with Python installed by default, but, they are usually not the latest.
This is a short guide on how to upgrade your Python to the latest version (Python 3.14) on Ubuntu Linux and solve associated issues. This guide covers two options to upgrade Python to the latest version:
- [Using UV](#method-1-using-uv) - which has become the de facto standard for Python version management. This is recommended way to work with Python
- Using apt - which is the default package manager for Ubuntu. This is the traditional way to work with Python.
If you want to install a different version of Python, this guide will cover that as well.
This guide is tested on Ubuntu 24.04 on WSL2, but should work on any Ubuntu version.
Prerequisites
You need the following
sudoprivileges on your systemcurlinstalled on your system
Method 1: Using UV
UV is a Python version manager that can be used to install, manage, and switch between multiple Python versions. An extremely fast Python package and project manager, written in Rust and replaces pip, pip-tools, pipx, poetry, pyenv, twine, virtualenv, and more.
This is extremely simplified and makes it easy to work with multiple Python versions and projects. Did I mention it is extremely fast? 10-100x faster than pip.
Step 1: Install UV
For this we first need to install UV, this can be done by running the following command:
curl -LsSf https://astral.sh/uv/install.sh | shYou need to then restart you shell by running the below command:
source $HOME/.local/bin/envNow, you can verify the installation by running
uv --version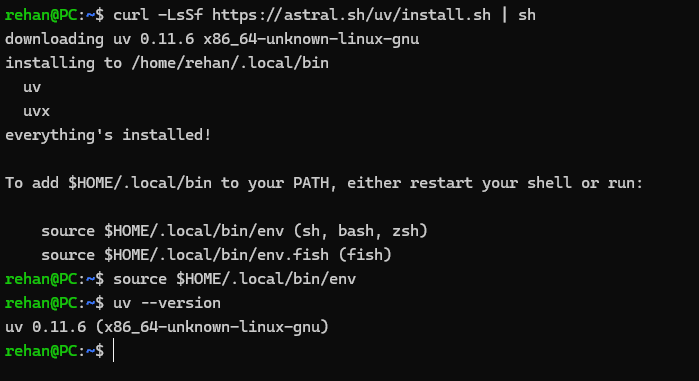
Step 2: Install Python 3.14
If you want to install python globally, you can do so by running the below command:
uv install python 3.14This will install the latest version of Python 3.14. To view all available versions, you can run the below command:
uv python list --only-installedThis displays all installed Python versions, including those that are not installed by UV.
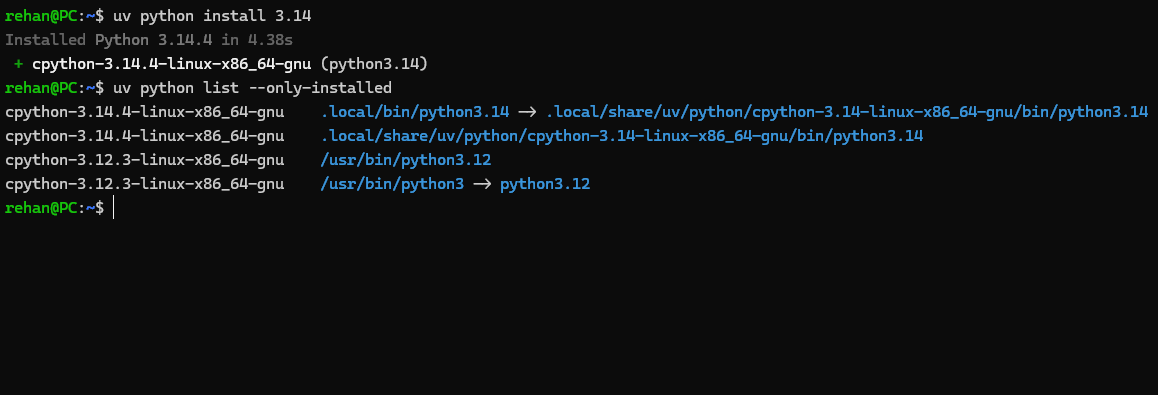
This doesn’t change the system default Python version.
If you want to change the system default Python version (which I warn against as it could result in system instability), you can find the instructions here.
Step 3: [Bonus] Python 3.14 using uv
The recommendation is you use uv to create a virtual environment for your project. This is because uv is designed to work with multiple Python versions and projects.
For each project, you can create a virtual environment by running the below command:
uv venv .venv --python 3.14This will create a virtual environment in the .venv folder. You can activate it by running
source .venv/bin/activateAfter that you can check where you python command is pointing to by running
which pythonThis should point to the .venv/bin/python file.
Now you can run python --version and you should see the latest version of Python as the output.
python --version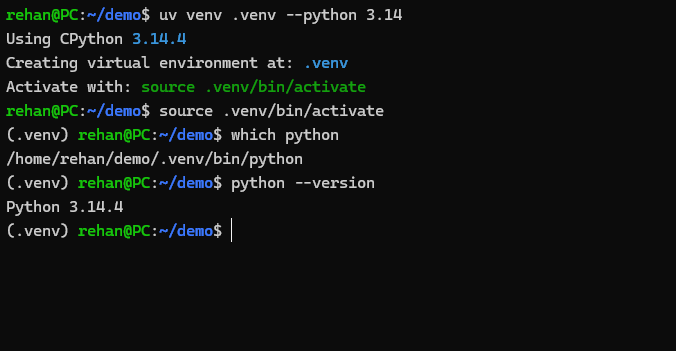
You can pin the version of Python in a project by running:
uv python pin 3.14This create a file named .python-version in the root of the project with the version of Python pinned. So if in future you can track which version of Python is used in the project.
Step 4: Installing packages in the virtual environment
The advantage of using uv is that you can isntall packages in a virtual environment without activating it or affecting the system Python version.
For example, you can install a package by running
uv pip install <package-name>This will install the package in the virtual environment.
Method 2: Using apt to install Python 3.14
Ubuntu’s default repositories do not contain the latest version of Python, but an open source repository named deadsnakes does.
If you’re on Ubuntu Desktop, changing the system-wide Python will break your Gnome terminal and potentially other system tools that depend on the default python3. Using virtual environments (described above) is the better approach for Desktop users. If you still want to proceed, follow the Desktop-specific steps below carefully.
Since WSL doesn’t have a GUI, this is largely safe on WSL, but still discouraged.
Step 1: Prepare to install Python 3.14
First, update your system by running
sudo apt update && sudo apt upgrade -ysudo add-apt-repository ppa:deadsnakes/ppa && \
sudo apt updateStep 2: Check if Python 3.14 is available
Check if Python 3.14 is available by running
apt list | grep python3.14This will produce the below result, if you see python3.14 it means you can install it
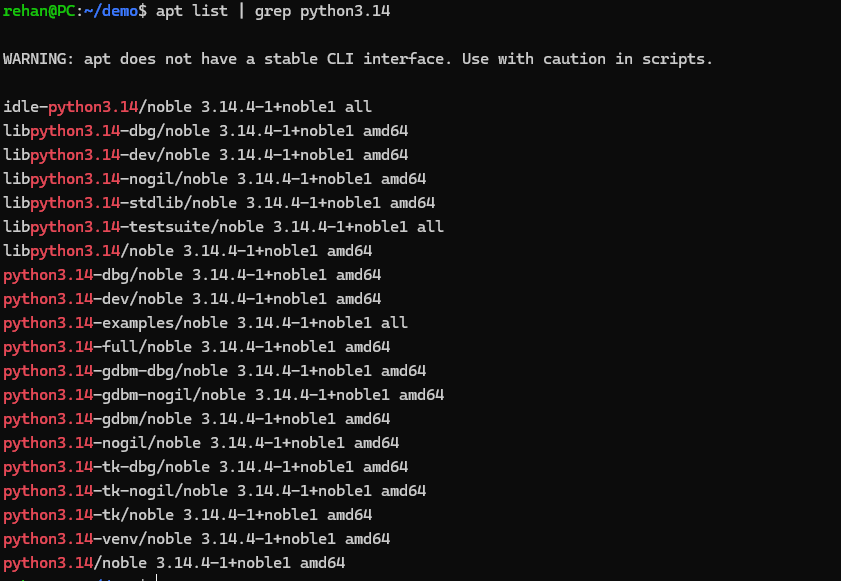
If you see something similar to the above, it means you can install Python 3.14.
Step 2: Install Python 3.14
Now you can install Python 3.14 by running
sudo apt install python3.14Now though Python 3.14 is installed, if you check the version of your python by running python3 --version you will still see an older version. This is because if you are using Ubuntu Desktop, the default Python is needed by the system and changing it will break your system.
Step 3: Run Python 3.14
You can run Python 3.14 by running
python3.14 --versionThe right way to run Python 3.14 On Linux Desktops is by using a virtual environment.
E.g. you can create a new virtual environment by running
python3.13 -m venv envand activate it by running
source env/bin/activateNow you can run python --version and you should see the latest version of Python as the output.
[Extra] Create an alias for Python 3.14
If you really, really, really don’t want to type python3.13 every time you want to run a file, you can create an alias.
If you are using bash, run
echo "alias py=/usr/bin/python3" >> ~/.bashrc
echo "alias python=/usr/bin/python3" >> ~/.bashrc
Or, if you have oh-my-zsh installed, you can avoid typing out python3 by running
echo "alias py=/usr/bin/python3" >> ~/.zshrc
echo "alias python=/usr/bin/python3" >> ~/.zshrc
After restarting your terminal, you can run your Python apps with py or python.
Optional: Set Python 3.14 as system default
If you’re on Ubuntu Desktop, changing the system-wide Python will break your Gnome terminal and potentially other system tools that depend on the default python3. Using virtual environments (described above) is the better approach for Desktop users. If you still want to proceed, follow the Desktop-specific steps below carefully.
Changing the default alternatives for Python will break your Gnome terminal. To avoid this, you need to edit the gnome-terminal configuration file.
Open the terminal and run:
sudo nano /usr/bin/gnome-terminalIn first line, change #!/usr/bin/python3 to #!/usr/bin/python3.12. Press Ctrl +X followed by enter to save and exit.
Then save and close the file.
Next, update the default Python by adding both versions to an alternatives by running the below
sudo update-alternatives --install /usr/bin/python3 python3 /usr/bin/python3.12 1
sudo update-alternatives --install /usr/bin/python3 python3 /usr/bin/python3.14 2
Now run
sudo update-alternatives --config python3Choose the selection corresponding to Python3.14 (if not selected by default).
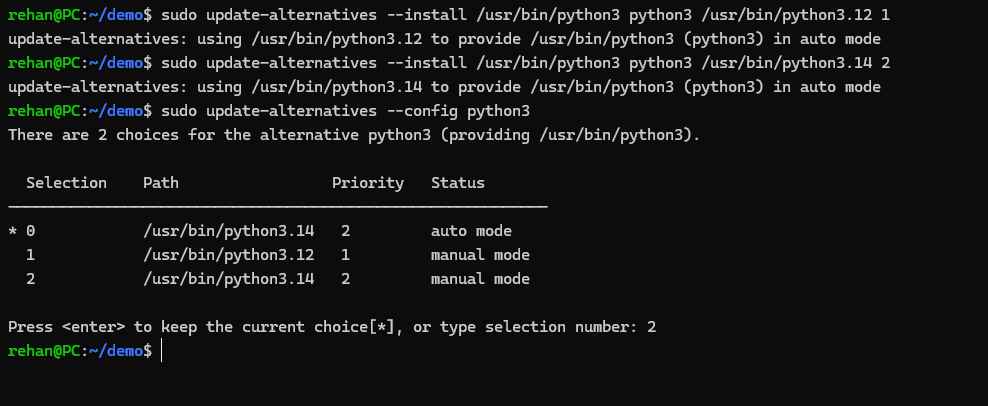
Now run python3 --version again and you should see the latest Python as the output.
[Extra] Fix pip and disutils errors
Installing the new version of Python will break pip as the distutils for Python3.13 is not installed yet.
[Extra] Fix Python3-apt errors
Running pip in terminal will not work, as the current pip is not compatible with Python3.13 and python3-apt will be broken, that will generate an error like
Traceback (most recent call last):
    File "/usr/lib/command-not-found", line 28, in <module>
        from CommandNotFound import CommandNotFound
    File "/usr/lib/python3/dist-packages/CommandNotFound/CommandNotFound.py", line 19, in <module>
        from CommandNotFound.db.db import SqliteDatabase
    File "/usr/lib/python3/dist-packages/CommandNotFound/db/db.py", line 5, in <module>
        import apt_pkg ModuleNotFoundError: No module named 'apt_pkg'
To fix this first remove the current version of python3-apt by running
sudo apt remove --purge python3-aptThen do some cleanup
sudo apt autocleanDO NOT RUN sudo apt autoremove as it will remove several packages that are required. This may break your system if you’re using GUI, if you’re on WSL2 you can proceed.
Finally, reinstall python3-apt by running
sudo apt install python3-apt[Extra] Install pip
Running pip will still throw an error pip: command not found. We need to install the latest version of pip compatible with Python 3.14.
Now you can install pip by running
curl https://bootstrap.pypa.io/get-pip.py -o get-pip.py && \
sudo python3.14 get-pip.py
If you get an error like
bash: curl: command not foundthen you need to install curl first by runningsudo apt install curl
Now you can run pip and you should see the output of pip --version
All should be done now. It is complicated, but this is how you update Python to latest version.
Bonus: Install a different version of Python
If you want to install a different version of Python, you can use the below command:
uv install python <version>This will install the specified version of Python.
Need help?
Start a discussion on GitHub if you’ve got questions or improvements. Open discussions →